This is the design document for the MRNet project.
MRNet is a suite of hardware modules and software protocols that can be plugged together in a hierarchical (i.e. tree-like) fashion and connected to a standard personal computer to provide a computerized model railroad layout. MRNet interoperates with the popular NMRA DCC standard. MRNet is based around standard personal computers, inexpensive Catagory 5 network cable and inexpesive microcontollers. The overall goal of MRNet is to achieve a significant advance in realistic model railroad operations at a reasonable price. It is intended that the MRNet electrical standards and software protocols be made freely available without any royalty or licensing obligations so that various vendors may compete in the marketplace to provide low cost and high quality products to the model railroad community. It is a futher goal of MRNet to reduce those rats nests of wires that are under so many model railroad layouts!
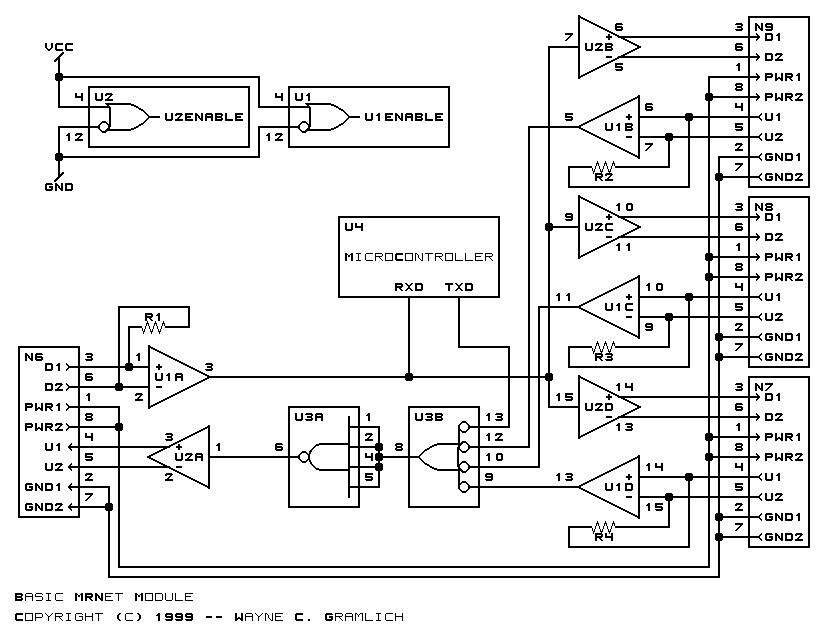
The MRNet architectual diagram is shown immediately below:
The layout is controlled from a standard personal computer using whatever hardware and operating system the owner wishes. A simulation/control program is run that can talk to the MRNet modules and/or DCC controller. The MRNet modules a grouped into cab stations, cabs, and layout control modules. A variety of different cabs are supported -- stationary, wired handheld, IR handheld, etc. The modules are intermixed in whatever fashion that makes under layout wiring easiest.
The current concept behind MRNet borrows heavily from the current hiearchical EtherNet technology (e.g. 10BaseT and 100BaseT.) In fact, I would expect future versions of MRNet to use actual EtherNet technology whenever microcontrollers start to have embedded Ethernet interfaces built onto the chip.
Basically, MRNet consists of a bunch of modules connected in a hiearchical (i.e. tree-like) fashion with cables. All modules that do anything interesting contain an embedded microcontroler with some sort of interface electronics for interfacing to MRNet (i.e. an on-board UART.)
The modules that make up MRNet consist of a root module that connects to a central control computer and a number of control and sensor modules. Example sensor modules are block occupancy, buttons being depressed, and handheld cabs. Example control modules are turnout controls, decoupling electromagnets, light/LED lights, etc.
{Cable Signal Introduction goes here.}
MRNet uses standard Ethernet technology Catagory 5 cable with RJ45 connectors. The cables are wired straight through with the twisted pairs connected to pins 1&2, 3&6, 4&5, and 7&8 of the RJ45 connector. Currently, only two of the pairs are used (4 wires total). The wire pairs are allocated as follows:
With the remaining pins, I am experimenting with using Cat5 cable for power distribution. I expect this experiment to fail. For the power distribution experiment, the remaining pairs are assigned as follows:
If the power distribution experiment fails, I expect the PWR1 and PWR2 signals to go away, and the GND1 and GND2 wires to be used as a ground reference. In this scenerio, each module would be attached to the ground reference through a resistor whose value is to be decided. There would be no rigid ground requirement, just a requirement that the grounds between successive modules be within a volt or so of one another. This should make ground loops be pretty much of a non-issue.
If the power experiment fails, I suggest that power distribution be done using standard 3.5mm (1/8 inch) power jacks. Wall transformers in a variety of voltages and currents are available with a 3.5mm jack on the end. The 3.5mm jack can also be run into a standard audio splitter cable so that one wall transformer can power more than one MRNet module.
Below are a bunch of questions with corresponding answers:
The MRNet modules are partioned into three broad catagories of modules:
Before diving into the various modules in greater detail, it should be pointed out that most MRNet modules have an up-link and 2 or more downlinks. A basic module looks as follows:
This circuit simply takes any signal from the link connector and replicates it to the three down link connectors. Similarly, the signal from the three down link connectors is logically OR'ed together to form the up link signal. It is important that no spurious signal be generated when nothing is plugged into a connector. Since the 26LS32 outputs a 1 signal when there is no signal present, it is necessary to do the OR'ing using `negative' logic. Hence, the use of NAND gates instead of OR gates.
The base parts list is shown in the table below:
As you can see, the required parts for a basic module total to less that 2 dollars using quantity one pricing from Jameco. Actually, U1 and U3 can be replaced by the even cheaper 26LS33 with open collector outputs (Jameco part 39626 for $0.49) and a couple of pull up resistors in some modules. Actually, the most expensive parts are the RJ45 connectors which cost $0.69 each from Digikey (Digikey part A9044-ND.) I feel confident that vendors will be able to get all of the parts listed above for substantially less than the quantity one prices listed above.
Name Description Jameco Part Jameco Price R1-4 100 Ohm 1/4 Watt Line Termination Resistor 29946 $0.89/100 U1 26LS32 Quad Differential RS-422 Receiver 39600 $0.79 U2 26LS31 Quad Differential Rs-422 Driver 39589 $0.79 U3 74LS20 Dual 4-Input NAND Gate 47095 $0.25 U4 Microcontroller
The purpose of a root module is to provide a connection to the controlling computer. There are a number of different connection standards that make sense for a computer connection. It is anticipated that a root module will be generated for each popular connection standard.
At the moment I have not layed out and root module printed circuit boards. Instead, I have included the functionality of an RS-232 root module on the wired cab station module. The next time I send in some printed circuit boards to be fabricated, I expect to have both an RS-232 and RS-422 root module layout out.
The next batch of modules have to do with cabs. A cab is the user interface for controlling trains on a model railroad layout. A stationary cab is one that is in a fixed location and does not move. A walk-around cab is a portable cab that moves around with the operator.
There are a number of differnt technologies that can be used for communicating between a walk-around cab and the layout computer -- wires, infra red signalling, and radio signalling. The cab station modules implement the portion of the signalling that bridges the gap from the layout to the walk-around cab. If the cab station to walk-around cab signalling is standardized, it is possible to have mulltiple different walk-around cabs all interoperating with one another (e.g. person A uses a wired cab from vendor A and person B uses a wired cab from vendor B and both plugging into the same wired cab stations.) Similarly, it is possible to conceive of a club layout that implements all three cab signaling technologies (i.e. wire, IR, and RF) and various club members using different cab signalling technology at the same time during an operating session (e.g. person A using a wired cab, person B using an IR cab, and person C using an RF cab.)
A reasonably long time ago I wrote up a fairly long wish list of what I might want in a walk-around cab. This document is called Handheld Cab Requirements and Issues. My plan is start out with fairly simple wired cabs and work my way towards more and more complicated cabs based on IR and RF signaling.
Before getting into the details of various cab options, I sat down and decided on some technology that could be used to construct walk-around cab boxes. This is written up in a separate document called Walk Around Cab Box Construction.
For each kind of cab communication technology (i.e. wire, infrared or radio frequency), there is a station that plugs into the MRNet. In the case of wire and infrared technology, these modules are sprinkled around the edges of the layout; conversely, for radio technology there is only one station needed. For each technology, there can be a multitude of different cab implementations that interoperate with one another as long as they use the same signalling protocols.
A wired cab uses a physical wire to connect the cab to MRNet. The connector that is used is a standard quarter inch phone jack (i.e. tip-ring-sleeve connector.) High quality versions of the connector are available from multiple vendors. Since the phone jack is axially symetric, there is now way to plug it in wrong. Power and ground are run on two of the conductors and the remaining conductor forms a bi-directional half duplex connection using open collector TTL gates. The wired cab station is acutally pretty dumb since it does not need a microprocessor to forward the MRNet signal to the wired cab.
I would like to digress a little and talk about plugging in wired cabs. One of the big problems with wired cabs is that they tend to require that the train operator take their attention off the train whenever it is time to plug the handheld cab into another cab station. The basic problem is that the operator has to find a fairly small jack hole and stick the jack into it. One potential solution to this problem is to make the hole bigger so that is can be found by sense of touch rather than having the operator divert their eyes from the train. This proposal is shown below:
In this proposal, a common plastic household funnel has its tip sawed off and mounted on the side of the train layout. The phone jack plug is mounted on a panel so that the plug is centered exactly behind the funnel hole. The means the train operator can feel along the side of layout until the funnel opening is found. As the end of the jack is pushed into the funnel, its tip is guided towards the plug hole.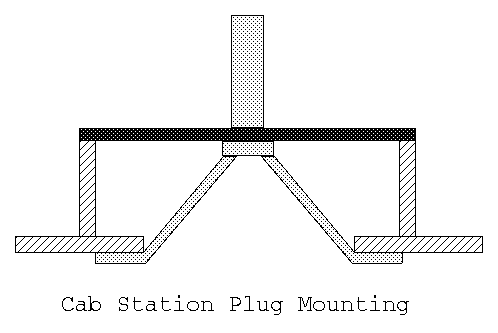
I have a wired cab station board layed out. As usual, I have several revisions:
Soon, I hope to start working on another wired cab that is not quite as large and bulky as the the first one.
An infrared cab station talks with an infrared cab via infrared signalling. In order to permit the train operator to keep his or her eyes on the train, both the infrared cab station and the infrared cab have multiple infrared send LED's and multiple infrared receivers. This design is still in its preliminary design stages.
I have not started any work on radio cab stations.
I have organized the next batch of modules over something I call a layout control mother board. The layout control mother board contains the microcontroller that talks to the rest of MRNet. A number of board plug into the layout control mother board to provide switch sensing, LED lighting, turnout control, block occupancy detection, etc. The modules are listed below:
{Summary goes here}
I would like to acknowledge that a number of very good ideas came from Rob Hupfield's Model Railroad Control Concepts page and his RRSim mail list. In addition, I would like to thank the members of the RRSim workgroup: