This is tutorial for µUL. It is currently work in progress. It is also available in PDF format.
µCL is an acronym for Microcontroller Language. It is a high level language designed specifically for programming 8-bit microcontrollers such as the PICmicro® (Peripheral Interface Controller) microcontrollers from MicroChip®. The motivation for creating µCL was born of a need for a powerful yet easy to use programming development tool to use with RoboBRiX™ a modular system for building robots.
The overall strategy for this tutorial is "hands on". The goal is actually get you to compile and execute the code on actual hardware. Thus, many of the early sections in this tutorial focus on how to use the µCL IDE (Integrated Development Environment), while later sections focus in of various aspects of the µCL language itself.
Without any further discussion, let's get going!
In order to download the software:
The µCL IDE (Integrated Development Environment) provides a graphical user interface to the µCL compiler and provides download and debugging facilities as well. The rest of this section provides a brief overview of the main IDE window without going into much detail. The details are discussed in sections that follow this one.
To start the µCL IDE on Linux, type the following to your favorite shell:
uclide &
On a Microsoft® operating system,
double click on the µCL IDE icon to get
it started
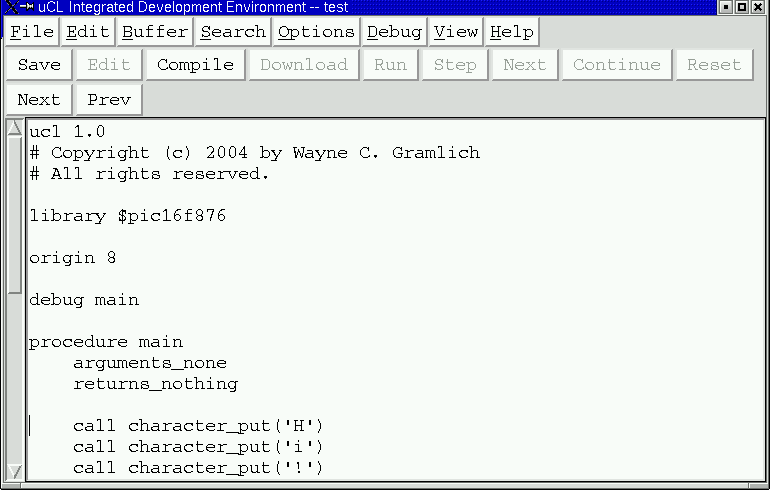
Once the µCL IDE starts up, you will be presented with a main window that looks as follows:
The main window consists of three rows of buttons followed by a scrollable program editing window.
The top row of "buttons" is a menu bar. Each menu bar button will pop up a menu of actions to select from. Briefly, the menu buttons are as listed below:
The second row of buttons are for very common operations in the IDE, such as compiling, downloading, and debugging operations. These operations are listed below:
The third row is for dealing with compiler errors.
The rest of the main IDE window consists of a scroll bar, and a text window for viewing program source. The scroll bar is deliberately placed on the left because most editing takes place on the left side of the editing window.
Before you can compile a file, you need to load it into the IDE. This is accomplished by selecting the [File]=>[Open] menu option. This brings up a file chooser window as follows:
This window allows you to browse around the computer system looking for files to load. The µCL compiler is really picky in that it refuses to compile anything that does not end with a suffix of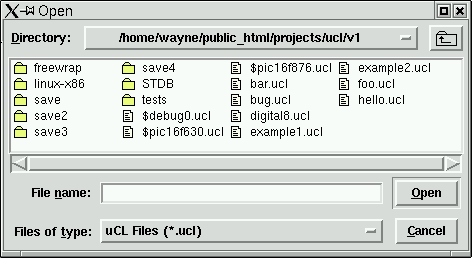
.ucl. For this example, we will
assume that you select the file example1.ucl.
If you do, the code panel will fill up with the
code as follows:
Please take a moment to click on the [Buffer] menu
button. This button displays list of loaded buffers
in the µCL IDE. Since we have loaded only
one file into a buffer, only the single buffer called
example1 is available.
The µCL stores files in internal memory buffers. You can make as many changes to the memory buffers as you want, but nothing becomes permanent until you explicitly save the files to disk (e.g. by clicking on the [Save] button.) By the way, if you try and quit without saving to disk, the µCL IDE tries to warn you with a pop up warning message.
In order to compile the file we just loaded,
just click on the [Compile] button. After a
brief pause a status message should appear
to the right of the [Prev] button that says
"No Errors". This is shown below:
Now take another moment to go back to the [Buffer]
menu button and look at it now. You should see
three buffers called example1,
$pic16f876, and $debug0.
As a side effect of compiling, the compiler
notified the µCL IDE that two additional
files were processed when compiling the
example1 program. The file
&pic16f876.ucl contains a
bunch of definitions for the PIC16F876
microcontroller. The file $debug0.ucl
is the small chunk of code that is added to
the example1 to enable debugging.
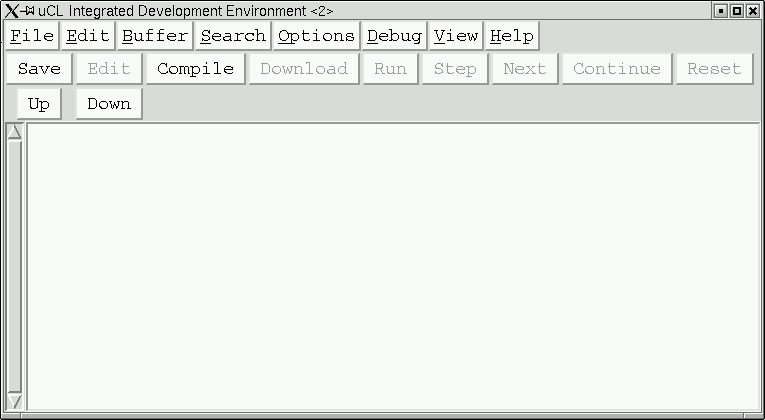
Please select [Buffer]=>[$pic16f876] to switch
switch over to $pic16f876 buffer.
Your IDE main window should look as follows:
Using the [Buffer] menu button, please return to the
example1 buffer.
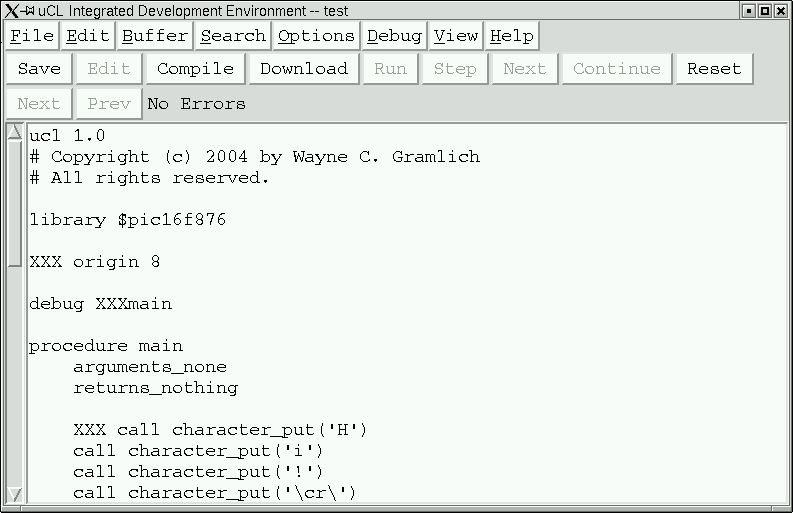
Now we are going to edit the example1
buffer to introduce three errors. This is
done by adding some extraneous characters such as
"XXX" to each of the following lines of code:
"origin 8", "debug main",
and "call character_put('H')".
These modifications are are shown below:
Now when you click on the [Compile] button you will get 3 errors and an IDE main window that looks as follows:
The message area to the right of the [Prev] buttons says "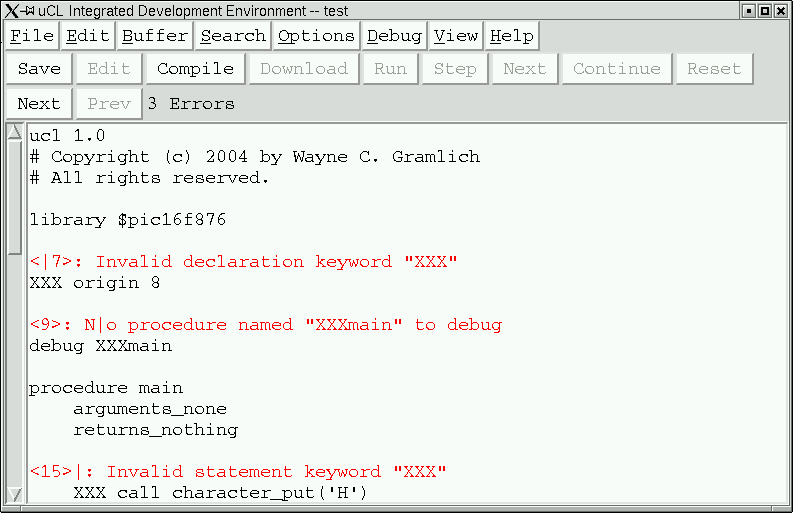
3 Errors". Before each line
there is a an error message of the form:
where<number>:message
Each error message also has a vertical bar
"|" tries to point at where on the
line the error was first detected. The is
vertical bar is spliced into the error message
irrespective of whether it splits a word. For
example, for the second error message the
vertical bar wound up splitting the word
No into N|o.
The [Next] and [Prev] buttons are used to navigate around between error messages. Clicking on the the [Next] button will scroll to next error message and clicking on the [Prev] button will scroll to the previous error message. Unfortunately, all of the errors in this example are visible on one page, so clicking on the [Next] and [Prev] buttons do not actually cause any scrolling to occur.
If there are multiple errors in multiple buffers, clicking on the [Next] and [Prev] buttons will automatically change buffers and scroll to the appropriate location. This is really useful for programs that are broken up into multiple files.
You are now free to remove the XXX
from the three statements. Please leave the
red error messages alone. The µCL IDE
will remove the error messages before sending
back to the compiler.
When you are all done, click on the [File]=>[Quit] menu button to exit the µCL IDE. There is a chance that it will pop up the warning message asking whether to save the modified buffers. In this case, please click [No].
That more or less covers the basics of using the µCL IDE to compile µCL programs.
The first program we will download and run is called
Example1. It will print the message as
a verification that your hardware is hooked up
correctly and that your software is properly
installed.
The Example1 program is listed below:
    ucl 1.0
    # Copyright &cr; 2004 by Wayne C. Gramlich.
    # All rights reserved.

    library $pic16f876

    origin 8

    debug main

    procedure main
        arguments_none
        returns_nothing

	call character_put('H')
	call character_put('i')
	call character_put('!')
	call character_put('\cr\')
	call character_put('\lf\')
	loop_forever
	    do_nothing

    procedure character_put
	argument character byte
	returns_nothing

	# This procedure will output {character} to the UART.

	while !$txif
	    do_nothing
	$txreg := character
That's it! Now we'll go through a line by line description
of what each line means.
The first line of every µCL program is always the following:
ucl 1.0
This declaration tells the µCL compiler that
this is, in fact, an µCL program, and that
it conforms to version 1.0 of the µCL language
specification. The first digit corresponds to the
major version number (i.e. "1") and the second
digit corresponds to the minor version number
(i.e. "0".) The minor version number is incremented
whenever new features are added that do not break
compatibility with prior programs. The major
version number is only incremented when an
incompatible change is made to the language
specification.
The next two lines,
    # Copyright © 2004 by Wayne C. Gramlich.
    # All rights reserved.
are called comments. Comments are completely
ignored by the µCL compiler but provide
the user with useful information about the
program in the form of notations within the
program itself. A comment always begins with
the sharp (i.e. '#') character and continues to
the end of line.
µCL uses th ISO (International Standards Organization) Latin-15 8-bit character set. The copyright (i.e. '©') character is perfectly legal and acceptable character in a comment or string.
In the example, there is a blank line between the second comment and the next program line. Just like comments, blank lines are ignored by the µCL compiler.
The next line is,
library $pic16f876
The library declaration instructs
the µCL compiler to go to a particular
file to fetch additional needed information
such as register definitions and reusable code.
The dollar sign (i.e. '$'), appearing as the
first character of the library name specifies
that the designated library file is to be found
in the system library directory.
The $pic16f876 library contains
declarations for the MicroChip PIC16F876
microcontroller.
The next line is:
origin 8
and specifies that the next procedure is to be started
at code address 8. This happens to be the address
at which code is executed when the "X"
command is typed into the RoboBRiX™
PICBrain11 boot loader.
The next line is:
debug main
which informs the compiler to generate debugging
code for the procedure named main.
The next line is:
procedure main
and declares that we are starting to define a procedure
named main. A procedure accomplishes
a specific sub-task of the whole program and
it can be executed one or more times. A program
basically consists of one or more procedures.
The main procedure is special because
it is always the first procedure that is called
in an µCL program. There must always be
a procedure named main or the compiler
will not know where to start program execution.
The main procedure does not have to
occur first in the program, although it is quite
common for it to be first.
The next line is,
arguments_none
and it tell the µCL compiler that the
main procedure is to be invoked
without any additional arguments. Note that
it is indented by four spaces from the left
margin. In µCL, indentation is
required!
The program will produce errors if the
declarations and statements for the procedure
are not properly indented.
The next line is,
returns_nothing
and it specifies that the main
procedure will not be returning any values.
This declaration is followed by a blank line that is ignored by the µCL compiler.
The next five lines are
	call character_put('H')
	call character_put('i')
	call character_put('!')
	call character_put('\cr\')
	call character_put('\lf\')
which consist of five calls to the
character_put procedure
to output the messages "Hi!" followed
by a carriage return and line feed.
The details of the '\cr\'
and '\lf\' are discussed
in a section further below.
The next two lines are:
	loop_forever
	    do_nothing
These two statements cause the microcontroller to go into an infinite loop doing nothing.
The next chunk of code is as follows:
    procedure character_put
	argument character byte
	returns_nothing

	# This procedure will output {character} to the UART.

	while !$txif
	    do_nothing
	$txreg := character
This code defines a new procedure called
character_put. It takes a
single argument called character
which is of type byte. The
while statement basically that
the processor is to wait until the
$txif bit becomes 1. The
$txif bit is defined in the
$pic16f876 library and corresponds
to the UART (Universal Asynchronous Receiver
and Transmitter) transmit interrupt flag.
When the transmit interrupt flag is 1, it
is acceptable to send another character.
The final line causes a character to be sent
by stuffing character into
$txreg.
Hookup up a microcontroller to your system is the next task. There are roughly three ways to do it:
{Put schematics here.}
The µCL programming compiler provides debugger support for the µCL IDE. The µCL debugger allows the user to set and clear breakpoints, examine and modify variable contents, and single step program execution. (Variable modification does not work for version 0.90.)
Some microcontroller applications can not use the debugger facility because they have hard real-time constraints that would not be met if program execution were to stopat a breakpoint. You will have to decide whether your application can tolerate being stopped at a debugger breakpoint or not. If not, you are more or less on your own and the µCL IDE debugger will not be of much use; otherwise, please continue reading.
Using the debug declaration,
you can specify a list of procedures for
which you want the compiler to produce extra
debugger support code. For each procedure
with debugging code enabled, the following
additional overhead is incurred:
The debug declaration has
the following form:
debug procedure_name, ...
where
procedure_name is
a procedure name.
It is time fire up the µCL IDE debugger. Please perform the following steps:
The debugger window consists of a text window with a scroll bar on the left, a stack row, and a command line row.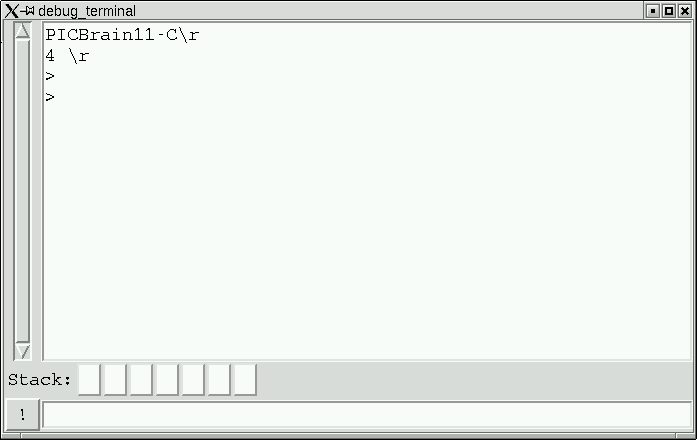
The "PICBrain11-C" is the boot
loader announce string and its presence in
the debug terminal indicates that the boot
loader inside the microcontroller is running
and in control. The ">" is
the boot loader command prompt character.
If your system does not contain the announce
string and command prompt, you need to go back
to the previous section and debug your hardware.
You can send commands to the boot load loader
by typing them into the command line entry at
the bottom of the debugger window. For example,
typing "V" into the bottom window
followed by depressing the [Enter] key will
use the boot loader to print out its version
number (currently "1.0".) Try it.
Similarly, typing "P00" will cause the first
page of code to be displayed in hexadecimal.
Again, please try it.
By the way, the [!] button in the lower left corner is the repeat button. If you type a command into the entry field and click on [!] it will send the command without deleting it from the entry field. This allows you to send the same command multiple times.
Now that we have verified that the boot loader
is working, it is time to compile up a program
and run the debugger on it. We are going to
use the example2.ucl program to
demonstrate the debugger. Please do the following:
example2.ucl,
Now click on the [Download] button. This causes
the hex file associated with example2.ucl
to be downloaded into the microcontroller. You
should see the hex file scrolling by. There
should be a ">" prompt with each
line. The debugger window should look sort
like the following:
Each line of the hex file should be preceded by a "
>" prompt. The last line
of the hex file is always ":00000001FF".
The boot loader prints out what its error condition
is as "Err=00", which signifies that
now errors occurred. If your debug window does
not look as described, please click on the [Reset]
button and then the [Download] button again.
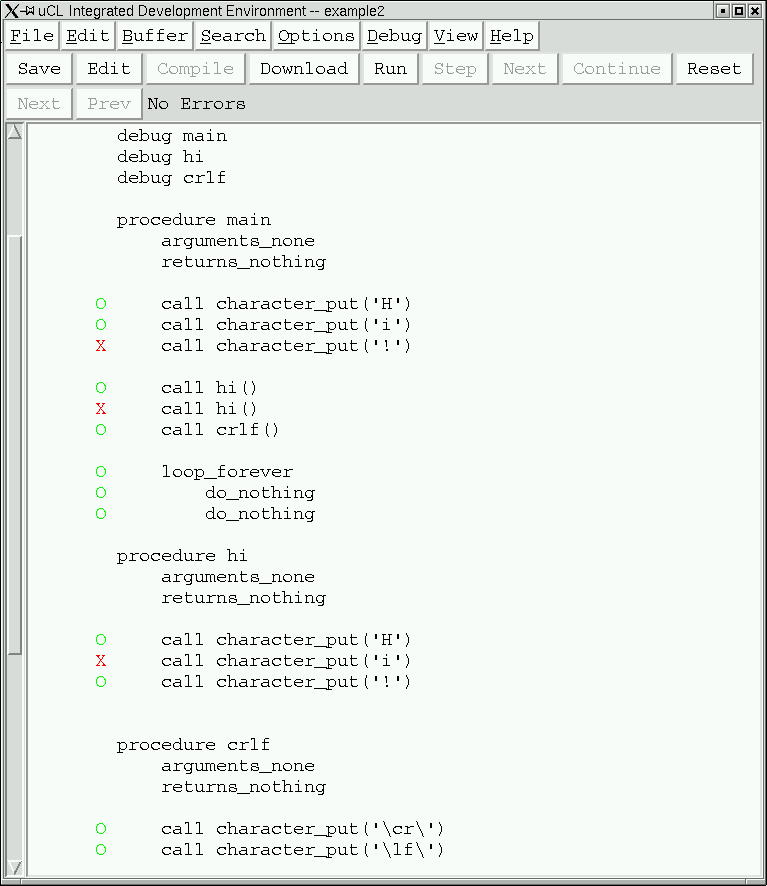
Moving our attention back to the main µCL IDE window, it should look something like this:
The program as been indented by 8 spaces. Each statement that the debugger can stop at is marked with a green "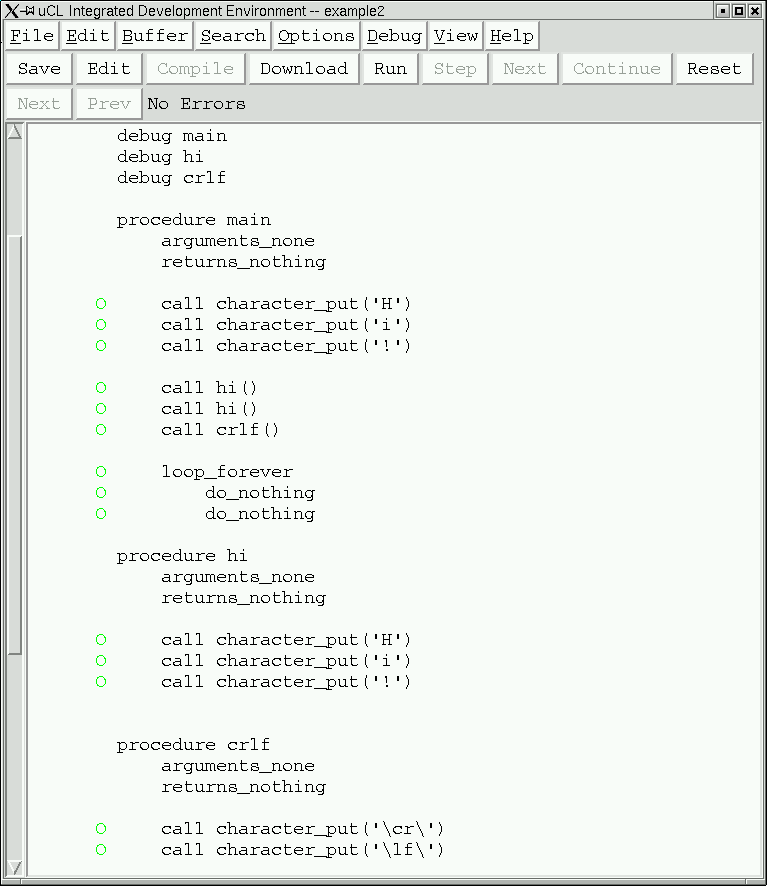
O".
There are five commonly used debugger buttons and they are listed below:
A breakpoint is an instruction to the debugger
to stop program execution when a particular
statement is encountered. To enable a breakpoint,
you click on one of the green "O"
characters and it will turn into a red
"X" character. When program
execution reaches one of the red X's, the
debugger will suspend execution and allow
you to examine various program variables.
To disable a breakpoint, click on the red
"X" and it will turn back into
a green "O" again. The screen
below has a few breakpoints set:
Once you have set your breakpoints, you can
start the program by clicking on the
[Run] button. The only thing
that happens is that the [Step], [Next],
and [Continue] buttons will become enabled
and the [Run] button will become disabled.
The program is now stopped at the very
beginning of the main procedure
before it has even executed any
initialization code.
{Realistically, I need to add some visualization of this state. Probably some sort of special arrow that points at the main procedure declarations.}
Now you are free to click on [Step], [Next], or [Continue] buttons. For now, click on the [Step] button and you will see a screen that looks as follows:
There is a program counter arrow that consists of "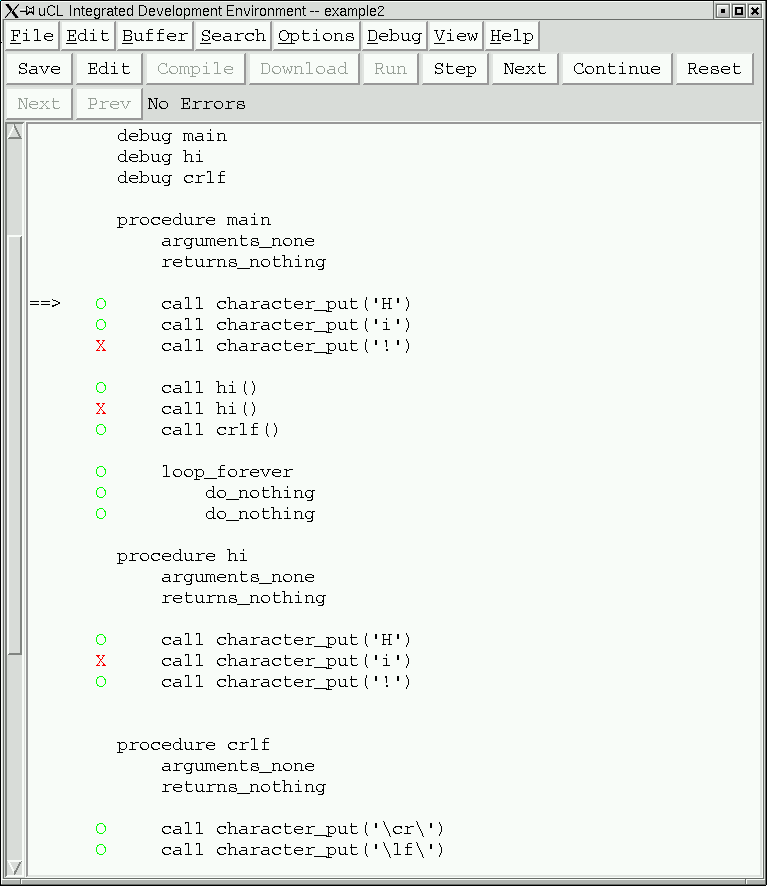
==>" that points to the
first statement in the program. Every time
the program is stopped at a statement, the
program counter arrow will point to the statement.
In addition, please look at the Stack line
in the debugger terminal; it should look
as follows:
The stack indicates that the procedure is stopped at line 17 (in the file) in the procedure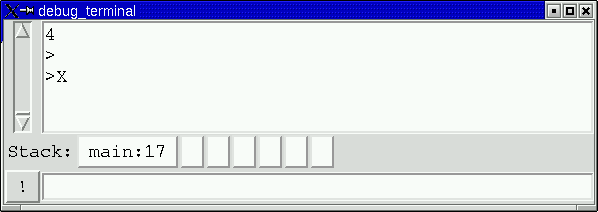
main.
{I think the stack should be moved to the main window.}
If you click on the [Step] button a few times
you will see it the program counter arrow
advance through the program one line at a
time. When you get to the first
call hi() statement and click
on [Step], it will transfer control to the
first statement in the hi
procedure. The stack is now two levels
deep and looks as follows:
This stack shows that the program is stopped at line 33 (in the file) in the
hi
procedure and was called from the statement at
line 21 (in the file) in the main
procedure.
As programs get bigger, you can click on the stack buttons to scroll to the location listed on the button. In this particular example, the the locations are so close together that typically no scrolling is needed.
If you look back at the source window, it looks as follows:
The current program counter arrow is pointing to the first statement in the
hi
procedure. In addition, there is a second
stack pointer, "=1>" that
points to the location in the stack where the
call originated from. The digit specifies
where in the stack the call came from.
If you keep clicking on the [Step] button,
you will eventually reach the final
loop_forever loop where
the program counter error will switch
between the two do_nothing
statements. A do_nothing
statement does not do anything except provide
a location for the debugger to stop at.
Now restart the program by clicking on the [Reset] button followed by the [Run] button. First, notice that the stack is cleared.
This time, keep clicking on the [Next] button.
The [Next] button differs from the [Step]
button in that it does not follow the flow
of execution into procedure calls. So,
when the program counter arrow gets to
the first call hi() statement
and you click on [Next], the program counter
simply advances to the next statement in
the main procedure.
Again, restart the program by clicking on
[Reset] followed by clicking on [Run].
Clicking on [Reset] does not clear any
of the breakpoints that you manually set.
Now, when you click on the [Continue] button,
the program resumes execution until one of the
breakpoints marked with a red "X".
It is possible to intermix the usage of the [Step], [Next], and [Continue] buttons. For fun, click on [Reset] and [Run] again and now intermix using the three buttons.
Sometimes a program "gets away" and does not run into any breakpoints. When this happens the three [Step], [Next], and continue buttons will remain disabled. Alas, there is no way to force the current program to stop at the next breakpoint. The only way to recover from this situation is to click on [Reset] and [Run] to restart the program.
So far, we have only focused on following the flow of program execution. It is also useful to be able to see the values of variables change as execution progresses.
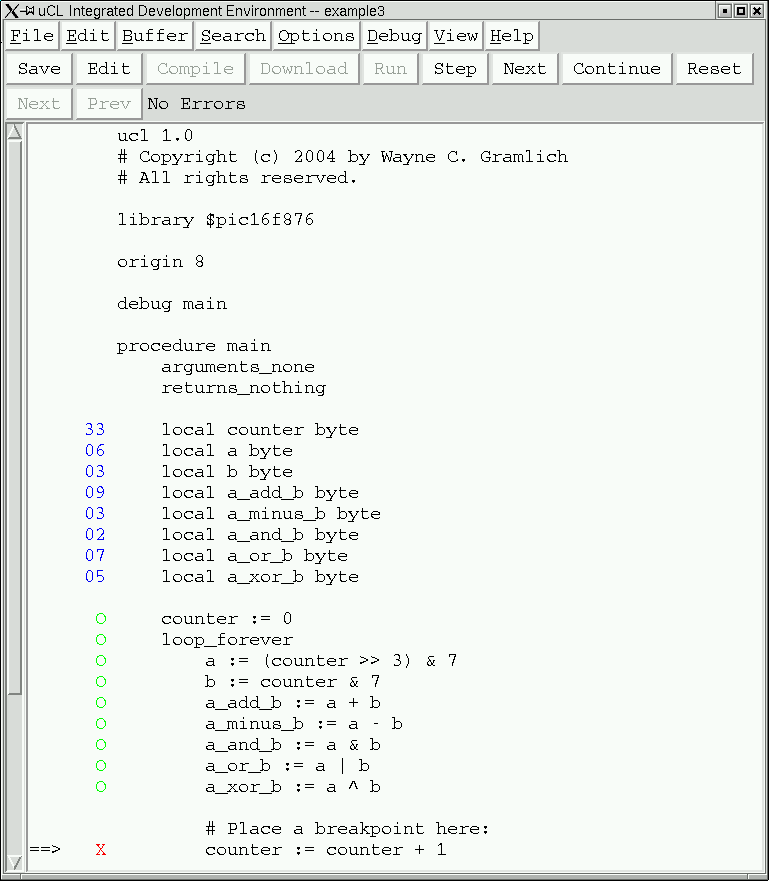
The next program to load is called
example3.ucl. Once you have
compiled the program and downloaded it,
please set a breakpoint on the last statement.
The main window should look as follows:
Each local variable has its current value represented in blue next to the variable declaration. In this particular example, the variable is represented with two question marks ("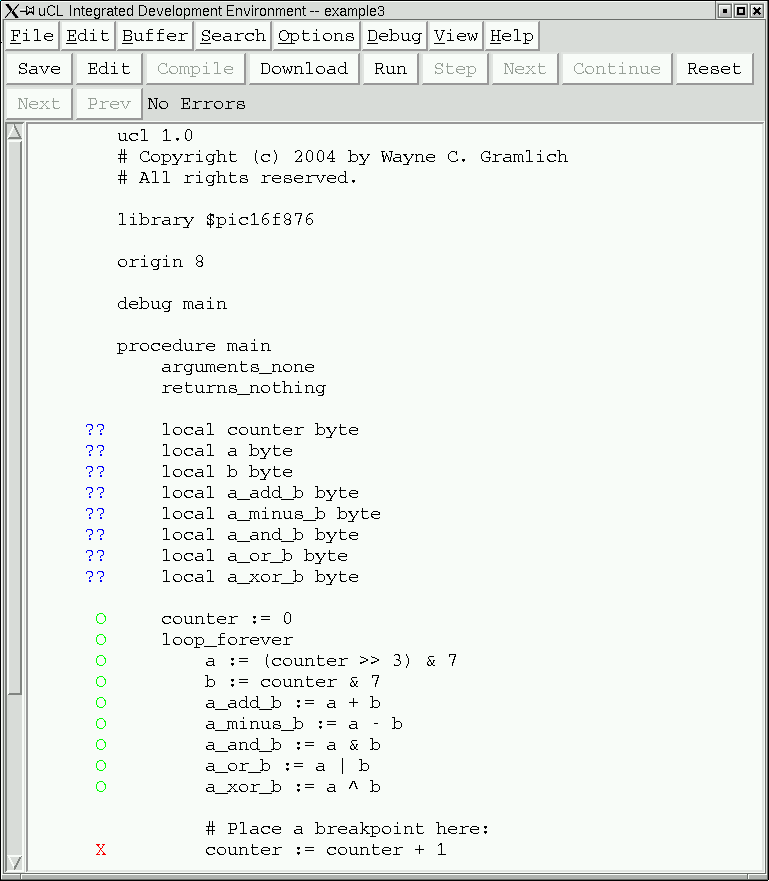
??") to indicate
that the debugger has not yet accessed
microcontroller memory.
Please click on [Run] followed by [Step].
When you do this, all of the "??"
values are replaced by the values that
happened to be in memory when the
microcontroller was powered up. The window
below gives an example of what it would look
like:
The variables are all represented as 2 hexadecimal digit numbers (i.e. 8-bits of data.) Please note that your microcontroller will almost certainly come up with some different values.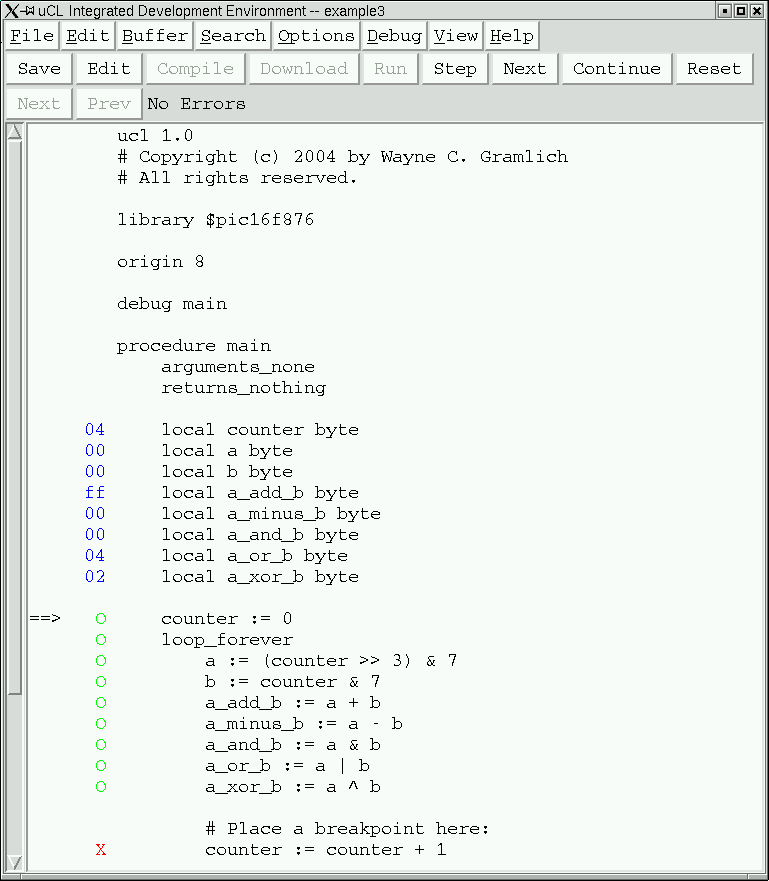
Lastly, please click on the [Continue] button to
catch the program on each iteration through the
loop. The window below shows the program values
when the counter has a value of
33 hexadecimal:
Being able to follow program flow and track variable values is a very powerful set of features for debugging programs. Future versions of the debugger (hopefully version 0.91) will also provide the ability to change values as well.
The only thing left to cover about the µCL debugger is to explain what your program needs to do in order share the UART on the microcontroller with the µCL IDE debugger. The baud rate for the on-board UART is set to 9200 baud by the boot loaded that has already been programmed into the microcontroller program memory. After the µCL debugger starts program execution, the program and IDE debugger stub must not get in the way of one another. Basically, your program is allowed to send back character codes in the range 0 through 254 inclusive. Code 255 is reserved exclusively for the µCL IDE debugger. When the µCL debugger sees code 255 it takes over control of the UART for the debugger. Do not not change the baud rate and do not send code 255 are all you have to remember.
Numbers in µCL are represented as either decimal numbers or hexadecimal numbers. (Note to C programmers: no octal numbers!) A decimal number is just a sequence of decimal digits ('0'-'9'). A hexadecimal number is a sequence of hexadecimal digits ('0'-'9', 'A'-'F', 'a'-'f') preceded by the prefix '0x'.
Some example numbers are:
Decimal Hexadecimal Decimal Hexadecimal 0 0x0 255 0xff 1 0x1 256 0x100 9 0x9 65535 0xffff 10 0xa 16777215 0xffffff 15 0xf 16777216 0x1000000 16 0x10 4294967295 0xffffffff
Note that 32-bit numbers can be represented (i.e. 232-1.) The numbers are unceremoniously truncated to fit within the precision of any variable.
A string is a sequence of zero, one or more Latin-15 characters enclosed in double quotes (i.e. "..."). A character is exactly one Latin-15 character enclosed in single quotes (i.e. 'x'). Non-printing characters are represented using an escape mechanism using pairs of back slash characters ('\'). The non-printing characters are represented as either numbers or symbols. The allowed symbols are:
Symbol Value Symbol Value Symbol Value Symbol Value Symbol Value nul 0 ht 9 dc2 18 esc 27 t 9 soh 1 lf 10 dc3 19 fs 28 n 10 stx 2 vt 11 dc4 20 gs 29 v 11 etx 3 ff 12 nak 21 rs 30 f 12 eot 4 cr 13 syn 22 us 31 r 13 enq 5 so 14 etb 23 sp 32 tab 8 ack 6 si 15 can 24 del 127 bsl 92 bel 7 dle 16 em 25 a 7 dq 34 bs 8 dc1 17 sub 26 b 8 sq 39
Some string examples are shown below:
    ""			# Empty string
    "a"			# String containing single letter "a"
    " "			# String containing single space
    "Hello, World!\n\"	# "Hello, World" followed by line feed
    "No.\tab\Desc.\lf\"	# String with tab and line feed in it
    "\bsl\"		# String containing single backslash
    "'"			# String containing single quote.
    "\sq\"		# String containing single quote
    "\dq\"		# String containing double quote
    "Español"           # String containing Latin-9 "ñ"
    "\dq\Hi\dq\"	# String encloses "Hi" in double quotes
    "Done!\10,13\"	# String followed by CR and LF
    "Done!\cr,lf\"	# String followed by CR and LF
(Note to C programmers: µCL strings are not null terminated; they have a size byte at the beginning. This means that µCL strings can contain embedded null characters.)
Some character examples are shown below:
    'a'			# The letter 'a'
    ' '			# A space
    'ñ'		# The Latin-9 ñ character
    '"'			# A double quote character
    '\dq\'		# A double quote character
    '\sq\'		# A single quote character
    '\tab\'		# A tab character
    '\0\'		# A null character
    '\nul\'		# A null character
The program below adds some calls to
uart_hex_byte_put to print
out some numbers and characters:
    ucl 1.0
    # Copyright &cr; 2004 by Wayne C. Gramlich.
    # All rights reserved.

    library $pic16f876
    library $uart

    procedure main
        arguments_none
        returns_nothing

        call uart_string_put("Hello\cr,lf\")
	call uart_hex_byte_put(16)
	call uart_character_put(' ')
	call uart_hex_byte_put(0xaf)
	call uart_character_put(32)
	call uart_hex_byte_put(-1)
	call uart_string_put("\cr,lf\")
Executing this program produces the following output:
    Hello
    10 af ff
A constant declaration allows you to a number (or string) to a symbolic name. From then on you can use the symbolic name interchangeably with the number. The symbolic name is likely to be more meaningful than the number.
The constant declaration has the following form:
constant constant_name = constant_expression
where constant_name is a
new symbol name for the newly defined and
constant_expression is an
expression that consists of other numbers, strings,
and constants.
Here are a few examples to get started:
    constant clock_frequency = 20000000
    constant instruction_rate = clock_frequency / 4
    constant version = "V1.3.2"
The first constant declaration is a simple one
that sets the symbol clock_frequency
to 20000000 (i.e.. 20MHz.) The second constant
declaration sets instruction_rate to the
value of the constant clock_frequency
is divided by 4. The third constant expression
sets version to the string
"V1.3.2".
Some of the expressions available in µCL are listed in the table below:
The table above is partial list of the more common expressions; a more complete list is provided in a section further below. In addition, expressions are listed from highest precedence (top) to lowest precedence (bottom) in the table. Thus,
Expression Description -e
~enegative e
bitwise NOT of ee1 << e2
e1 >> e2e1 shifted right by e2 bits
e1 shifted left by e2 bitse1 ^ e2 e1 bitwise XOR (exclusive OR) with e2 e1 & e2 e1 bitwise AND with e2 e1 | e2 e1 bitwise OR with e2 e1 * e2
e1 / e2
e1 % e2e1 multiplied by e2
e1 divided by e2
e1 modulo (i.e. remainder) e2e1 + e2
e1 - e2e1 added to e2
e1 minus e2e1 ~ e2 e1 string concatenated with e2
-a * b - c * d is grouped as
((-a) * b) - (c * d). You may add
parenthesis to improve readability and change
order of operation.
A constant declaration may not reference a constant the its declared further down. They must be ordered so that all constants in the constant expression portion of a constant declaration have been previously defined.
The program below shows a few constant declarations in operation:
    ucl 1.0
    # Copyright &cr; 2004 by Wayne C. Gramlich.
    # All rights reserved.

    library $pic16f876
    library $uart

    constant clock_frequency = 20000000
    constant instruction_rate = clock_frequency / 4
    constant baud_rate = 2400

    constant space = ' '
    constant crlf = "\cr,lf\"
    constant hello = "Hello" ~ crlf

    procedure main
        arguments_none
        returns_nothing

        call uart_string_put(hello)
	call uart_hex_byte_put(16)
	call uart_character_put(space)
	call uart_hex_byte_put(0xaf)
	call uart_string_put(crlf)
A variable is used to store a value. There are two kinds of variables -- global and local. The format of a global variable declaration is:
global variable_name variable_type
and the format of a local variable declaration is:
local variable_name variable_type
where the declaration must occur with in a procedure
declaration. There are actually a few more kinds of
global variables (shared and
register) but they are more specialized
and are in a section further below.
Global variables are accessible by all procedures in an µCL program. Local variables are only accessible from the procedure that they are defined within. It is legal for a local variable to have the same name as a global variable, in which case the procedure can only access the local variable.
Both global and local variables are uninitialized in µCL.
An assignment statement in µCL looks as follows:
variable := expression
Where variable is either a
local or global variable and expression
is an expression consisting of numbers, strings,
variables, and/or constants. A few example
assignments statements are shown below:
    counter := 0
    counter := counter + 1
    average := (a + b) >> 1
The program below shows some local and global variables along with a few simple assignments:
    ucl 1.0
    # Copyright &cr; 2004 by Wayne C. Gramlich.
    # All rights reserved.

    library $pic16f876
    library $uart

    global glob byte

    procedure main
        arguments_none
        returns_nothing

	local loc byte

	glob := 0
	loc := 0
	call uart_hex_byte_put(loc)
	call uart_character_put(' ')
	call uart_hex_byte_put(glob)
	call uart_character_put(' ')
	call glob_increment()
	call uart_hex_byte_put(loc)
	call uart_character_put(' ')
	call uart_hex_byte_put(glob)
	call uart_string_put("\cr,lf\")

    procedure glob_increment
	arguments_none
	returns_nothing

	# This variable "loc" is different from the one in main:
	local loc byte

	loc := 0xff
	glob := glob + 1
The following output results:
00 00 00 01
Procedures are sequences of statements that can be re-executed multiple times. The overall structure of a procedure declaration is:
    procedure procedure_name
	argument_declarations
	return_declaration

	local_variable_declarations

	statement_list
where
procedure_name argument_declarations argument declarations, or a
single arguments_none
declaration,
returns_declaration returns
declaration or a returns_nothing
declaration,
local_variable_declaration local
variable declarations, and
statement_list The following is an example procedure that takes two arguments and returns one result:
    procedure average
	argument left byte
	argument right byte
	returns byte

	return (left + right) >> 1
This procedure takes two arguments and returns the
average of the two. It is invoked in a expression
as follows:
    local high byte
    local low byte
    local threshold byte
    ...
    threshold := average(high, low)
    ...
In this example the values of the the high
and low variable is copied to the
argument variables left and right
respectively. The returned result is assigned to
the variable threshold.
Another example procedure takes no arguments and has no return values:
    procedure global_count_increment
	arguments_none
	returns_nothing

	global_count := global_count + 1
This procedure is invoked using a call statement:
    ...
    call global_count_increment()
    ...
The exact format of an argument declaration
is as follows:
argument argument_name argument_type
where
argument_name argument_type argument declaration
for each procedure argument.
If the procedure has no arguments, there must be a
single arguments_none declaration that
just consists of the word arguments_none
sitting on a line by itself:
arguments_none
A procedure may or may not return a value. If it
returns a value, it must have a returns
declaration of the following form:
returns return_type
where
return_type
If the procedure does not return anything, there must
be a returns_nothing declaration than
has the following form:
returns_nothing
We talked about indentation very briefly in section 3. It is time to talk about it a little more carefully. µCL is a programming language that uses indentation to group statements and declarations together. The reason for this is to provide better error messages. Languages that do not use indentation to perform grouping, tend to have significantly worse error message handling when a grouping error is made.
The way indentation works, is that the µCL compiler sweeps through the entire program and figures out what column the first printing (i.e. non-whitespace) character occurs in on each line. For the code fragment below, the starting column is the number on the left.
        ...
    0	procedure main
    4	    arguments_none
    4       returns_nothing
    0
    4       local counter byte
    0
    4       counter := 0
    4       loop_forever
    8           if counter & 1 = 0
    12              call phase1()
    8           else
    12              call phase2()
    8           counter := counter + 1
    0
    0   procedure phase1
        ...
First, blank lines are ignored. Each time the column
number increases from one non-blank line to the next
non-blank line, a new grouping is started. This is
indicated with the { character.
Each time the column number decreases from one
non-blank line to the next non-blank line, one or
more groupings are closed. Again this indicated with
a } character. For the code fragment
above, the grouping characters are shown between
the appropriate lines as shown below:
        ...
    0	procedure main
            {
    4	    arguments_none
    4       returns_nothing
    0
    4       local counter byte
    0
    4       counter := 0
    4       loop_forever
                {
    8           if counter & 1 = 0
                    {
    12              call phase1()
                    }
    8           else
                    {
    12              call phase2()
                    }
    8           counter := counter + 1
                }
            }
    0
    0   procedure phase1
        ...
(Note to C programmers: Some C programmers feel that the curly braces add to the legibility of the code. With the exception of figuring out what column number a line starts on, µCL totally ignores curly braces. Just so long as the code is properly indented, the µCL compiler will happily ignore them.)
The simple statements in µCL are the
assignment, call, if,
switch, and return
statements.
The assignment statement is previously covered
in section 6. The assignment statement is unique
in µCL in that it is the only statement
that does not start with a "keyword". Instead,
the µCL compiler scans each line and if
it finds a line with the assignment operator
(i.e. ':=') in it, it assumes that
the line is an assignment statement. An interesting
side effect of this design choice is that µCL
can add new keywords without breaking any existing
code.
The call statement is first seen in
section 3. It's purpose is to evaluate an expression
for its side-effects. The format of the call
is as follows:
call call_expression
where
call_expression
The return statement causes the current
procedure to terminate and returns control the
calling procedure. The format of the return
statement is as follows:
return return_expression
where
return_expression
The if statement is a real is used
for testing conditional values. It has the following
overall form:
    if expression1
	statements1
    else_if expression2
	statements2
    ...
    else_if expressionN
	statementsN
    else
	statementsN+1
where
expressioni statementsi else_if
clauses. The else clause is also
optional. The first expression that evaluates to 1
causes its corresponds statement list to be
executed. No other statement lists are executed.
If none of the expressions evaluate to 1, the last
sequence of statements in the else clause
are executed (if they are present.)
The switch statement is used to perform
a multi-way branch. The switch statement
has the following form:
    switch switch_expression
      case_maximum maximum_expression
      case case_expression1
	statements1
      case case_expression2
	statements2
      ...
      case case_expressionN
	statementsN
      default
	statementsN+1
where
switch_expression maximum_expression switch_expression,
case_expressioni switch_expression, and
statementsi> switch_expression
matches the corresponding
case_expressioni. maximum_expression clause and
the default clause is optional. There
must be at lease one case clause.
{Example goes here.}
The iteration statements are the
loop_forever,
loop_exactly, and while.
The loop_forever statement has the
following form:
    loop_forever
	statements
where
statements
The loop_exactly statement has the
following form:
    loop_exactly loop_exactly_expression
	statements
where
loop_exactly_expression statements
The while statement has the following
form:
    while while_expression
	statements
where
while_expression statements while_expression
evaluates to a 1.
As Moore's law continues its onslaught of further miniaturization, many microcontroller instruction sets run into code and data space problems. A code space problem occurs when there is insufficient space in the control flow instructions (i.e. GOTO, CALL, etc.) to properly access all available program memory. The data space problem occurs when there is insufficient space in the data access instructions to access all available data. A typical solution to these problems is to add bank switching bits. The µCL language has some direct support to deal with microcontroller instruction sets that have resorted to either code or data banks.
The code_bank declaration has the
following form:
code_bank code_bank_expression
where
code_bank_expression
For example, the PIC16F87x series of microcontrollers
has up to 4 code banks of 2048 instruction words each.
The code fragments below show how the
code_bank declaration works:
    ...
    code_bank 0
    procedure main
	...
	call data_sample()
	...
	call data_process()
	...

    code_bank 1
    procedure data_sample
	...

    code_bank 2
    procedure data_process
	...
In this code the procedure main is in
code bank 0, data_sample is in code bank 1,
and data_processes is in code bank 2.
The µCL compiler is responsible for managing
all of the extra instructions required to call a
procedure in one code bank from another code bank as
shown by the calls to data_sample and
data_process from procedure main
in the fragment above.
You are permitted to switch back and forth between code banks as many times as you want. The µCL compiler will complain if there is insufficient space in a code bank to contain all of the requested procedures. When placing procedures into specific code banks, it prudent to try to minimize the number of calls between code banks to minimize the amount of time wasted producing code bank manipulation instructions.
The same problem that occurs with code banks can also occur with program data for some microcontrollers. For example, the MicroChip PIC16F87x microcontrollers have 4 data banks of 128 bytes in each bank, where some of the bytes are hardware control registers, some are reserved for future expansion, and the rest are available data memory.
The data_bank declaration has the
following form:
data_bank data_bank_expression
where
data_bank_expression
The code fragment below shows how the
data_bank declaration controls
where variables are allocated.
    ...
    data_bank 0

    global phase byte

    procedure main
	...
	local counter byte
	....
	phase := 1

    data_bank 1

    procedure sample_data
	....
	local low byte
	local high byte
	local average byte
	...
	phase := 2
In the fragment above, the global variable
phase and local variable
counter are in data bank 0.
The local variables low,
high, and average
are in data bank 1. The µCL compiler
is responsible for generating the extra
instructions needed to switch between data
banks without any further assistance.
The µCL compiler will inform you if you run out of storage from a given data bank.
On some microcontrollers, there is some memory
that is shared between data banks. For example,
the MicroChip PIC16F87x series has 16 bytes of
shared memory. This memory is prized because
it can be accessed without requiring any extra
data bank switching instructions. The
shared declaration provides a way
to allocated global variables from this pool of
shared memory.
The shared command has the following
form:
shared variable_name variable_type
where
variable_name variable_type As usual, the µCL compiler will inform you if try to allocate too many variables in shared memory.
The initial versions of µCL only support a small number of basic types. These basic types are shown in the table below:
Over time, this list will be expanded until it eventually includes signed and unsigned integers of up to 32 bits and some floating point numbers as well.
Type Size Smallest value Largest value Bit 1 0 1 Byte 8 0 255 Unsigned8 8 0 255 String
In µCL, strings are a sequence of bytes with a fixed contents and unchangeable length (i.e. they are read-only.) There are some restrictions on
{More about expressions goes here.}
Libraries are the primary method available to µCL programmers for code reuse. They are typically used to provide all of the register and bit definitions for a particular flavor of microcontroller and they are used provide libraries of procedures that can be shared between different applications.
A library declaration has the following
form:
library library_name
where
library_name By convention, libraries that have names that start with a dollar sign character ('$') are taken from the µCL system directory; otherwise, they come from the same directory as the source file. No path names are permitted; the library must come one directory or the other.
Libraries are only processed once. Each subsequent request to include the same library will be silently skipped over.
{more here}
{more about pins here}
{assembly code goes here}
{controlled delays}
{more about interrupts here}