This is one of my
electronics projects. It is currently
work in progress.
The µCL Project
µCL stands for "Micro-Controller Language" where
micro is written using the greek letter micron (`µ').
It is pronounced `UK-el' (rhymes with `chuckle'.)
When it is written using only letters from the roman
alphabet, it is written as `uCL'.
I have a number of projects that need to use PIC
microcontrollers from
MicroChip Corporation. These projects include
RoboBricks and
MRNet. There will be other projects. While I could
handcode these projects in assembler, I decided that
it would be better to use a higher level language.
Some sort of C compiler would do the trick, but I am
unaware of any that run on the Linux/BSD platform.
Even if they did, C is not a real good match to an
8-bit microcontroller. So, I decided to write my own
micro programming language called µCL. As an
ex-compiler and linker sort of guy, I find this sort
of project to be `fun'.
µCL is coded in the Tcl/Tk scripting language
because it is readily available on almost all
interesting platforms. The latest version of Tcl/Tk
seems to be available at
http://dev.scriptics.com/. Tcl/Tk seems to be
transitioning over to
SourceForge and to
http://www.tcltk.org/. I'll let the dust settle
for a while before I try and figure out what all of the
correct links are. µCL should run on any version
of Tcl/Tk past version Tcl/Tk 7. The µCL language
borrows a lot of features from Tcl/Tk in order to simplify
the µCL implementation effort.
This is one of those projects that mutated as it grew.
Initially, µCL started life as a fairly primitve
hack written in Tcl/Tk. As it evolved, I removed
restrictions and it has become a fairly general purpose
microcontroller programming language. If I had known
it was going to grow like this, I would not have
coded it in Tcl/Tk, but some other more tedious language
that does it bit more compile time type checking.
Such is life.
In order to obtain µCL, perform the following
steps:
-
Go to
http://dev.scriptics.com/ and download the
latest version of Tcl/Tk for your platform.
For some of the Unix platforms, this may involve
downloading the source code an compiling it.
-
Next, visit the
µCL Download Page. That page will
list the latest version of µCL in both
GZip'ed TAR format (.tar.gz) or ZIP format
(.zip).
-
Now uppack the either the ucl.tar.gz file or
the ucl.zip file using the your favorite
unpacking tool. The resulting contents will
reside in a directory labeled "ucl-X.YY", where
X.YY is the version number for the &mirco;CL
compiler.
On Unix, after unpacking the archive, do the following:
-
Type `
cd ucl-X.YY' to change
into the appropriate directory.
-
Type `
chmod +x ucl ucl.tcl'
to make the µCL compiler executable.
To run µCL under Unix, just type "ucl base_name"
where "base_name" is the name of the µCL
source file without any .ucl suffix. For example,
to compile "example1.ucl", just type "ucl example1"
and it will generate example1.asm, example1.lst,
and example1.hex.
To run µCL under Windows, do the following:
-
From a MSDOS window, start the Tcl shell interpreter.
This is done by typing something like "tclsh##" where
"##" is the Tcl version number. As of December 1999,
"tclsh82" is the proper version. Be sure to look at
the .../Bin directory to see what version you actually
downloaded.
-
Once in the Tcl interpreter. Type
`source compiler.tcl' at the Tcl interpreter prompt.
This will read in µCL compiler and programming
environment. Be sure that the "compiler.tcl" file
is in the same directory that you started the Tcl
shell interpreter in. When you have successfully
loaded the compiler, a message of the form
"Usage ucl_file..." will be printed out.
-
In order to compile a file, type "compile base_name",
(or "c base_name") where "base_name" is the name of
the µCL source file without any .ucl suffix.
For example, to compile "example1.ucl", type
"compile example1". In this example, this will
generate example1.asm, example1.lst, and example1.hex.
You can use the `c' command (1-letter command) instead
of `compile'.
-
To fire up the programming enviroment, you need
to run wish (e.g. wish82), type "source compiler.tcl",
followed by "edit base_name" (or "e base_name") where
"base_name" is the name of a µCL source
file without any .ucl suffix.
Thanks go to Steve Zellers at Apple who provided the
following instructions for MacOS:
-
Run the TclSell application from the Scriptics
Mac Tcl/Tk port.
-
At the prompt, type
`source /macos/Desktop Folder/ucl-X.YYucl.tcl'.
You should get:
uCL version X.YY
Usage ucl ucl_file ...
-
Set the path to your .ucl files using the `path'
command. For example,
path /macros/Desktop Folder/ucl-X.YY
Type `compile ucl_base_name' (or simply
`c') to compile an .ucl file. For example:
compile example1
Alternatively, you can download
http://www.basilsoft.com/uCLApp.sit.hqx
and uncompress it in the same directory as your
ucl.tcl file. This is a simple wrapper application
that will compile files dropped on it. It only lets
you compile one file at a time.
I had to move the language specification into
a separate
µCL Language Specificaton document.
Below is a screen shot of the µCL programming
environment.

It consists of an integrated editor, compiler,
and debugger. The top most sub-window contains
a bunch of control buttons, radio buttons, and
entry fields. The bottom sub-window consists of
a text editor with scroll bar on the left.
The programming environment has two modes --
compile/edit mode and debug mode. In compile/edit
mode, you may edit the program and compile it
until there are no more errors. In debug, mode
the program is downloaded into a processor and
you may set breakpoints, examine data, etc.
In debug mode, the text in the editor sub-window
is read-only.
The buttons sub-window is shown below:

The buttons sub-window functions are described below:
-
Seach Buttons
-
There a a bunch of buttons, radio buttons,
and entry fields used for searching:
-
[Search Entry]
-
This is the entry field immediately to
the right of the [Search] button.
The text typed into this field is
searched for.
-
[Search] Button
-
When pressed, this button will search
for the text in the [Search Entry].
-
<Fwd> Radio Button
-
When pressed, this radio button causes
the search to progress from the current
insertion point forward.
-
<Back> Radio Button
-
When pressed, this radio button causes
the search to progress from the current
insertion point backward.
-
<No Case> Radio Button
-
When pressed, this radio button causes
a case insensitive search to occur.
-
<Case> Radio Button
-
When pressed, this radio button causes
a case sensitive search to occur.
-
<Exact> Radio Button
-
When pressed, this radio button causes
a search to match only exact matches
of the txxt in the [Search Entry] field.
-
<Reg. Exp.> Radio Button
-
When pressed, this causes the text in
the [Search Entry] field to be
interpretted as a regular expression.
-
[Replace Entry] Field
-
This entry field provides replacement
text for the [Replace Button].
-
[Replace] Button
-
When pressed, this button will take
the most recently matched field with
[Search] button and cause it to be
replaced with the text from the
[Replace Entry] Field.
-
Clip Board Buttons
-
-
[Cut] Button
-
This button removes the currently
selected text from the edit window and
places it into the clip board.
-
[Copy] Button
-
This button takes the currently selected
text from any window and and places it
into the clip board.
-
[Paste] Button
-
This button takes the current clip board
contents and inserts them into the edit
window where the insert mark is.
For visual convenience, here is the buttons sub-window
again:
Some additional description follows:
-
Font Buttons
-
-
<Font12> Radio Button
-
When pressed, this button causes the text
in the edit window to be displayed in an
approximately 12 point font.
-
<Font14> Radio Button
-
When pressed, this button causes the text
in the edit window to be displayed in an
approximately 14 point font.
-
<Font18> Radio Button
-
When pressed, this button causes the text
in the edit window to be displayed in an
approximately 18 point font.
-
Edit and Compile Buttons
-
-
[Save] Button
-
This button causes the current .ucl, .asm,
.lst, and .hex files to be written out.
-
[Compile] Button
-
This button causes the current editor
sub-window contents to be compiled.
Any error messages are merged back in
in Red. (See Compiler Errors below.)
-
<Edit> Radio Button
-
When pressed, this radio button causes
the editor to be in "edit" mode.
-
<Quitgt; Button
-
When pressed, this causes the editor to
immediately exit. Be sure to press the
[Save] button before clicking this button.
-
Message label ("No Errors")
-
The label to the right of the [Paste] button
is used to show breif error and status
messages.
-
Debug Buttons
-
-
<Debug> Radio Button
-
When pressed, this radio button causes
the editor to be in "debug" mode.
(See debug mode below.)
-
[Run] Button
-
When pressed, the program execution is
started.
-
[Next] Button
-
When pressed, the program runs until the
next breakpoint is encountered.
-
[Step] Button
-
When pressed, the program executes a single
statement and then stops.
The screen shot below shows how compiler errors
are merged into the source code right before the
error.
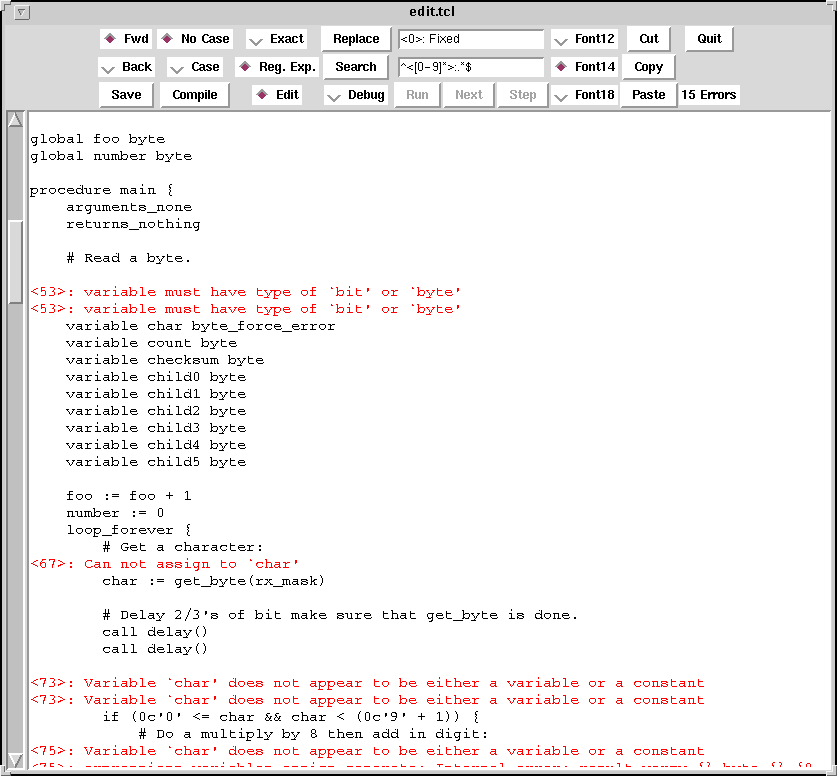
The format of an error message is
<line_number>: Message.
Once an error is fixed, you may click on the
[Search] button to go to the next error message.
Once you have fixed enough errors, you click
on the [Compile] button to cause the program to
be recompiled.
The screen shot below shows the programming
environment in debug mode.
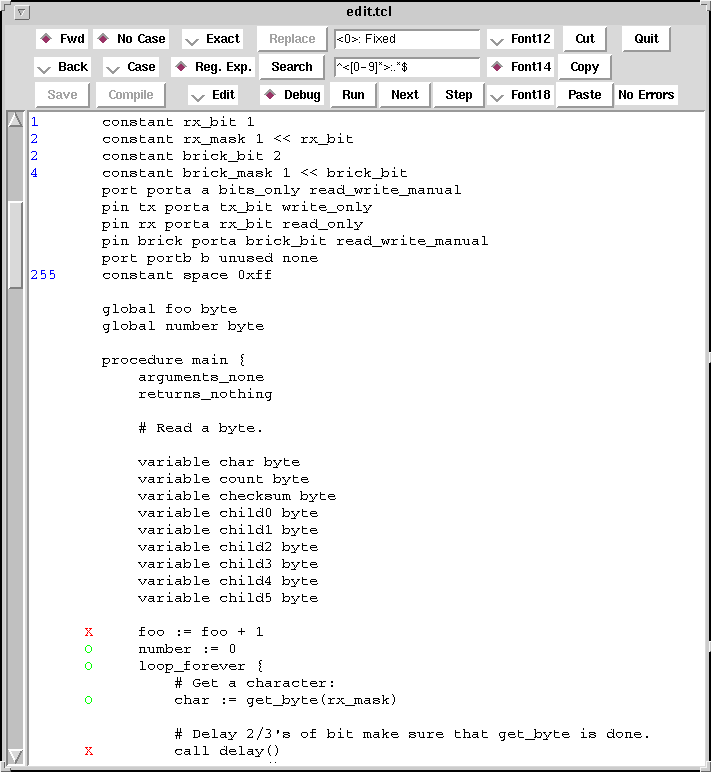
Debug mode is entered by clicking on the >debug<
radio button. This causes the text editor to go into
read only mode and inserts a margin of white space
down the left side of the editor. The margin contains
some annotations in blue, red, and green.
The blue annotations are the values of constant
declarations.
The red X's and green O's are break points. A break
point is a location where a program can be stopped.
When it is a red X, that means the break point is set
and the debugger will stop program execution before
hand. When it is a green O, the break point is clear,
and execution proceeds unimpeeded. A break point
is set by clicking on top of a green O; conversely,
a break point is cleared by clicking on top of a red X.
As the programming environment develops there will be
ways to set and clear data values and a way to see
where the current program counter is.
{Examples should go here.}
The following things need to be done to µCL
more or less in priority order:
-
Maintain test suite
-
Fix some peep hole optimizer bugs -- 1) breaks
uniform delay, 2) detect (ADDWF xxx,F ; MOVF xxx,W),
3) select bank size based on pic12 or pic14, add
some more aggressive peep hole optimizations.
-
Replace count_down with do_while statement.
-
Detect when code space is exhausted.
-
Be more careful about the presense/absense of
literal operators ADDLW and SUBLW.
-
byte_var@3 := port_pin seems to move everything
through a temporary bit variable.
-
"if (bit_var) a := a | 0x80" seems to miscount
the number of instructions by 1.
-
The count_down statment in a uniform delay seems
to miscount the instructions.
-
There seem to be problems with the && operator
and bit variables.
-
Fix multiple returns in call1 test.
-
Get arbitary bit expression assignment to work.
-
Change `direction' command to take a property list.
-
Fix the bind declaration to allow binding to
globals (e.g. "bind ramp0 ramps[0]").
-
Fix unary operator parsing
-
Get negate and bit complement working
-
Add conditional compilation statements.
-
Implement operator assignment
-
Fix the FIXME's
-
Add 16-bit integers and 24-bit floats.
-
Get multiplication and division to work
-
Improve detection of bad tokens
-
Get shifting by an expression to work
-
Improve shift by 7 code generation
-
Rename 'nop' to 'delay' statement
-
Add a debugger
{Summary goes here.}
Copyright (c) 1999 by
Wayne C. Gramlich.
All rights reserved.